Näytetään tekstit, joissa on tunniste Lapasen ohje - Mitten Pattern. Näytä kaikki tekstit

tiistai 11. joulukuuta 2012

Täplikkäät lapaset - White on Black


Piilosilmukoilla virkatut lapaset, aikuisten koko. Ohje alempana.
Mittens crocheted in slip stitches, adults' size. Instructions in English at the bottom of the page.
Piilosilmukoilla virkatut lapaset.
Mittens crocheted in Slip Stitches.

Ohje on aikaisemmin julkaistu toisessa blogissani 7.1.2011. Tässä paranneltu versio.

Sekä valkoinen että luonnonmusta lanka ovat Villa Laurilan 4-säikeistä hahtuvalankaa, 285 tex x 4, 100 % suomenlammasvillaa. Lankaa kului yhteensä 170 g, mustaa hieman enemmän kuin valkoista. Kahdella värillä virkatut lapaset ovat todella paksut ja lämpimät nurjalla kulkevien lankajuoksujen vuoksi.

Hyvin yksinkertainen lapasen perusmalli, ei peukalokiilaa. Kuvan lapanen on naisten kokoa. Käytin 4,0 mm koukkua ja virkkasin löysiä silmukoita.

Kuvio on jaollinen kahdeksalla (2 s valk, 2 s mustaa, 2 s valk/mustaa, 2 s mustaa). Kuvan lapaset on virkattu 40 silmukalla. Ohuempaa lankaa käytettäessä voit virkata esim. 48 tai 56 silmukkaa.

Reunus

Virkkaa 40 ketjusilmukkaa ja yhdistä ne renkaaksi piilosilmukalla. Virkkaa piilosilmukoita (eli kiinteitä ketjusilmukoita) 4 kerrosta niin, että virkkaat uudet silmukat edellisen kerroksen silmukoiden takareunasta. Virkkaa 1 krs vuorotellen 2 s mustaa, 2 s valkoista. Virkkaa toinenkin krs muuten samoin, mutta siirrä värin vaihtumiskohtaa 1 s verran oikealle, eli osuta 1. valkoinen silmukka edellisen kerroksen jälkimmäiseen mustaan silmukkaan, ja 2. valkoinen silmukka edellisen kerroksen ensimmäiseen valkoiseen. Näin valkoiset silmukat näyttävät kuin ne olisivat päällekkäin. (Jos kerroksen vaihtuessa silmukkamäärät eivät mene tasan, lisää tai vähennä tarpeen mukaan yksi silmukka.) Virkkaa 1 krs mustalla. Virkkaa 1 krs vuorotellen 3 s mustaa, 1 s valkoista, ja osuta valkoiset silmukat edellisten valkoisten täplien puoliväliin. Virkkaa 1 krs mustaa niin, että valkoisten silmukoiden kohdalla poikkeuksellisesti kiinnität uudet silmukat valkoisten silmukoiden 'taakse', jotta valkoisten silmukoiden molemmat reunat jäävät näkyviin valmiissa työssä. Mustien silmukoiden kohdassa virkkaat siis silmukan takareunaan, ja valkoisten kohdassa silmukan 'taakse'. Virkkaa vielä 1 krs mustaa (yht. 9 krs reunusta).

Lapasensuuhun kannattaa tehdä parin sentin reunus virkkaamalla silmukan takareunaan, jotta suu ei lähde rullautumaan vaan pysyy suorana. Ensimmäistä kerrosta virkatessa voit vaihtoehtoisesti poimia ketjusilmukkaketjun takaa sen 'pampulan' (camel hump). Tällöin aloituskerroksen reunasta tulee hieman erinäköinen (lettimäinen).

Virkkaa 1 krs mustaa, mutta tästä eteenpäin silmukoiden etureunaan. Pyri virkkaamaan silmukoista nyt löysempiä. Etureunasta virkatut silmukat nimittäin tahtovat kiristyä liikaa, ja työ helposti kapenee.


Lapasosan kuvio

Virkkaa piilosilmukoita silmukoiden etureunaan 2 s mustaa, 2 s valkoista, ja virkkaa samoin yht. 3 krs. Osuta kerroksen vaihtuessa värit kohdakkain eli virkaa mustaa mustiin ja valkoista valkoisiin. Näin raidat alkavat kulkea vasemmalle. (Tarvittaessa lisää tai vähennä yksi silmukka, jos silmukkamäärä ei täsmää. Vähentäminen: Virkkaa 2 s yhteen. Lisääminen: Virkkaa ensin 1 s silmukan takareunaan, sitten 1 s saman silmukan etureunaan.)

Kuvio 1 (yllä)
xx oo xx oo xx
xx oo xx oo xx
xx oo xx oo xx

Virkkaa kuvion 2 mukaan 3 krs niin, että joka toisen valkoisen raidan kohdalle virkkaat mustaa. Sido pitkät lankajuoksut nurjalla.

Kuvio 2

xx oo oo oo xx
xx oo oo oo xx
xx oo oo oo xx

Jatka virkkaamalla vuorotellen kuviota 1 ja kuviota 2.


Peukaloaukko

Jätä peukaloaukko haluamallesi korkeudelle. Kuvan lapasissa on virkattu yht. 13 krs ennen peukaloaukkoa. Virkkaa 10 ketjusilmukkaa (huom. vaihda värit kuviota vastaavasti eli 2 s mustaa, 2 s valkoista jne), mutta älä kiinnitä niitä edelliseen kerrokseen. Laske peukaloaukon reunasta 10 s, ja kiinnitä silmukkaketju taas edelliseen kerrokseen. Jatka kuvion 1 ja kuvion 2 mukaan.


Kärkikavennus

Jatka virkkaamista, kunnes pikkurilli on piilossa tai noin 2 cm puuttuu lapasen pituudesta, ja tee sen jälkeen kärkikavennukset. Kavenna 1 krs:lla yksi silmukka joka toisessa valkoisessa raidassa. Kuvan lapasissa kavennus on aloitettu valkoisen katkonaisen raidan kohdalta eli mustalta alueelta (mustista silmukoista 6 s --> 5 s). Virkkaa välillä 1 krs kaventamatta, jos haluat loivemman kärkikavennuksen. Kavenna 1 krs:lla mustat 5 s --> 4 s. Kavenna 1 krs:lla sekä mustista (4 s --> 3 s) että valkoisista raidoista (2 s --> 1 s). Kavenna 1 krs:lla mustista 3 s --> 2 s. Kavenna 1 krs:lla loput valkoiset silmukat pois. Kavenna lopussa joka silmukalla, kunnes jäljellä on pieni aukko, jonka voi sulkea parilla pistolla.


Peukalo

Aloita virkkaaminen peukaloaukon reunasta, osuta kuvio kohdalleen. Aloita oikeasta kulmasta ja etene alareunaa pitkin vasemmalle. Virkkaa kaikki alareunan silmukat (10 s), ja 'hävitä' kulmassa 2 s, jotta kuvio säilyisi, eikä peräjälkeen tulisi 4 s samalla värillä. Poimi siis heti kulman jälkeen peukaloaukon yläreunasta 2 s vähemmän (kulmaan ei tule reikää, katso vain tarkkaan mihin kohtaan virkkaat :) ). Sen jälkeen jatka kuviota virkkaamalla mustaa mustiin ja valkoista valkoisiin peukaloaukon yläreunassa. Toisessa kulmassa vastaavasti lisää kulmaan 2 s, jotta saat neljän samaa väriä olevan silmukan väliin 2 eriväristä silmukkaa.

Jatka kuvioiden 1 ja 2 mukaan. Kun peukalo on piilossa, aloita kaventaminen. Kavenna joka silmukalla.

Päättele langanpäät. Valmiit lapaset pesin ja vanutin kevyesti. Lapasten kuivuttua vielä harjasin ne nurjalta pehmeiksi.
In English

This pattern was previously published in my other blog on 7th January 2011. This is edited version.

Both natural white and natural black yarn are Villa Laurila's thich unplied 285 tex x 4, 100 % Finnish Sheep wool. I used total 170 g yarn, black a bit more than white one. Mittens crocheted with two colours are very thick and warm due to the loose strands on the reverse

This is a very simple basic mitten pattern with no thumb wedge. These mittens fits women. I used 4.0 mm hook, and pulled the stitches rather loose.
The pattern is divisible by 8 (2 s white, 2 s black, 2 s white/black, 2 s black). In the mittens on the photo there are 40 stitches. If you use thinner yarn, you may need to crochet for example 48 or 56 stitches.

The cuff

Crochet 40 chain stitches and join them with a slip stitch. Crochet 4 rows of slip stitches into the back loop of the stitch. Crochet 1 row by alternating 2 s black, 2 s white. Crochet similarly another row, but move the colours to the right by one stitch, that is crochet 1st white stitch into the latter black stitch of the previous row, and the 2nd white stitch into the first white stitch of the previous row. That makes the white stitches look like they were on the top of each other. (If the stitch count does not match, either increase or decrease one stitch.) Crochet 1 row in black. Crochet 1 row by alternating 3 s black, 1 s white, and match the white stitches between the previous white spots. Crochet 1 row in black in a way that at white stitches crochet "into the behind" of the white stitch, in order to leave both loops of the white stitches visible on the front side of the work. That is, at black stitches crochet into the back loop, and at white stithces crochet 'behind'. Crochet another 1 row in black (edging is total 9 rows).

It's worth making a short 'cuff' by crocheting into the back loop, because that keeps the cuff straight and it won't curl up. When crocheting the first row, an alternative is to crochet into the small bumb behind the chain (camel hump). That will make the edge look a bit different (plaited).

Crochet 1 row in black, but from now on into the front loop. Try to keep your stitches loose. Crocheting into the front loop namely easily pulls the stitches tighter than intended, and your mitten may become way too narrow.

Patterns

Crochet slip stitches into the front loop, 2 s black, 2 s white, and crochet similarly total 3 rows. Match the pattern colours at the 'seam', that is crochet black on black, and white on white. That makes the stripes lean to left. If the stitch count does not match, increase or decrease one stitch. Decreasing: Crochet 2 s togehter. Increasing: Crochet first 1 s into the back loop, and then another stitch into the front loop of the same stitch.

Pattern 1 (above)
xx oo xx oo xx
xx oo xx oo xx
xx oo xx oo xx

Crochet 3 rows per Pattern 2 so that you crochet black into every second white stripe. Wrap the loose strands on the reverse.

Pattern 2

xx oo oo oo xx
xx oo oo oo xx
xx oo oo oo xx

Continue crocheting by alternating Patterns 1 and 2.

Thumb opening

Crochet 13 rows the wrist part patterns (or the desired lenght). Crochet 10 chain stitches (note: change colours respectively to the pattern), skip 10 stitches at the edge of the mitten, and then connect the chain of stitches to the mitten edge again. Continue crocheting by alternating Patterns 1 and 2.


Top of the mitten

Continue crocheting until the little finger is covered, or until about 2 cm is missing from the total lenght of the mitten. Start then decreasing. Decrease on 1 row one stitch in every second white stripe. In the mittens on the photo, the decreasings have been started at the white discontinuous stripe (black stitches 6 s --> 5 s). Crochet 1 row without decreasings if you want a rounder tip. Decrease on 1 row black stitches 5 s --> 4 s. Decrease on 1 row both black stitches 4 s --> 3 s, and white stitches 2 s --> 1 s. Decrease on 1 row black stitches 3 s --> 2 s. Decrease on 1 row the rest of the white stitches away. Then decrease at every stitch until there is a small hole which you can close by sewing with a couple of stitches.


Thumb.

Crochet the thumb, and match the patterns. Start at the right lower corner, and continue along the lower edge to the left. Crochet all the 10 stitchese at the lower edge, and then at the corner 'skip' 2 stitches, in order to avoid having 4 stitches in a row in one colour. That is, when you move at the corner to the upper edge of the thumb opening, 'skip' there the first two stitches (and no, there won't be a hole, just look carefully where to crochet into :) ). Then continue crocheting the pattern, black on black, and white on white at the upper edge of the opening. At the other corner respectively add 2 s, in order to have 2 s of another colour in between the 4 s of the same colour.

Continue crocheting Patterns 1 and 2. When the thumb is covered, start decreasing at every stitch.

Weave in the threads. Finished mittens I washed and fulled slightly. When the mittens were dry, I brushed them fluffy and warm on the inside.


maanantai 10. joulukuuta 2012

Täplää - More spots


Piilosilmukoilla virkatut lapaset, lasten koko. Ohje alempana.
Mittens crocheted in slip stitches, children's size. Instructions in English at the bottom of the page.

Piilosilmukoilla virkatut lapaset
Mittens, Slip Stitch Crochet

Sekä valkoinen että ruskea lanka ovat Villa Laurilan 4-säikeistä hahtuvalankaa, 285 tex x 4, 100 % suomenlammasvillaa. Lankaa kului yhteensä 120 g, ruskeaa hieman enemmän kuin valkoista. Kahdella värillä virkatut lapaset ovat todella paksut ja lämpimät nurjalla kulkevien lankajuoksujen vuoksi.

Hyvin yksinkertainen lapasen perusmalli, ei peukalokiilaa. Kuvan lapanen mahtuu noin 10-11-vuotiaalle. Käytin 4,0 mm koukkua ja virkkasin löysiä silmukoita.

Kuvio on jaollinen kuudella (3 valkoista silmukkaa ja 3 ruskeaa). Kuvan lapaset on virkattu 36 silmukalla, ja  aikuisen kokoon saman paksuisella langalla tarvitset 42 silmukkaa. Ohuempaa lankaa käyttäessäsi voit joutua virkkaamaan esim. 48 tai 54 silmukkaa.

Virkkaa 36 ketjusilmukkaa ja yhdistä ne renkaaksi piilosilmukalla. Virkkaa piilosilmukoita (eli kiinteitä ketjusilmukoita) 5 kerrosta niin, että virkkaat uudet silmukat edellisen kerroksen silmukoiden takareunasta.  Lapasensuuhun kannattaa tehdä parin sentin reunus tällä tavoin, jotta suu ei lähde rullautumaan vaan pysyy suorana. Ensimmäistä kerrosta virkatessa voit vaihtoehtoisesti poimia ketjusilmukkaketjun takaa sen 'pampulan' (camel hump). Tällöin aloituskerroksen reunasta tulee hieman erinäköinen (lettimäinen).

Reunuksen jälkeen jatka virkkaamista piilosilmukoilla niin, että virkkaat uudet silmukat edellisen kerroksen silmukoiden etureunasta. Pyri virkkaamaan silmukoista nyt löysempiä. Etureunasta virkatut silmukat nimittäin tahtovat kiristyä liikaa, ja työ helposti kapenee. Aloita kuvion virkkaaminen, ja virkkaa 11 krs (tai haluamasi pituus).

Kuvio: Kolme silmukkaa valkoisella, kolme ruskealla jne. Toisella kerroksella jatka samalla tavalla, eli valkoisten silmukoiden kohtaan virkkaat valkoista ja ruskeisiin ruskeita. Virkkaa tällä tavalla kolme kerrosta (kuvio on 3x3). Neljännelle kerrokselle siirtyessäsi virkkaa valkoisiin silmukoihin ruskeita. Huom. kuvion vaihtuessa (aina 3 krs:n jälkeen) joudut kerroksen vaihtumiskohdassa virkkaamaan samalla värillä 6 silmukkaa peräjälkeen (sido pitkä lankajuoksu nurjalla).

xxx ooo xxx ooo
ooo xxx ooo xxx
ooo xxx ooo xxx
ooo xxx ooo xxx
xxx ooo xxx ooo
xxx ooo xxx ooo
xxx ooo xxx ooo  <--

Kun olet virkannut kuviota 11 krs (tai haluamasi pituuden), jätä aukko peukalolle. Huom. Koska kerroksen vaihtumiskohdassa kuvio hieman poikkeaa, ja kerroksen vaihtumiskohta liukuu kerros kerrokselta vasemmalle yläviistoon, jätä kerroksen vaihtumiskohta kämmenpuolelle. Oikean käden lapasessa aloituslangapää peukalon puoleiseen reunaan, ja vasemman käden lapasessa aloituslanganpää pikkusormen puoleiseen reunaan.

Peukaloaukkoa varten virkkaa 8 ketjusilmukka (Huom. vaihda väriä kuviota vastaavasti 3 s:n välein), hyppää reunassa 8 silmukan yli, ja kiinnitä sitten silmukkaketju jälleen lapasen reunaan. (Tällä langalla 8 s levyinen peukaloaukko riittää myös naisten koon lapaseen).

Jatka kuvion virkkaamista, kunnes pikkusormen pää on piilossa; kuvan lapasessa on virkattu 12 krs. Tee sen jälkeen kärkikavennukset. Huom. vaihda kuviota aina 3 krs:n jälkeen (vaihtoehtoisesti voit jättää kuvion vaihtamatta, jolloin kärkeen muodostuu raitoja). Kavenna 1. krs:lla jokaisen valkoisen ruudun silmukoista yksi pois. Kavenna 2. krs:lla valkoisten ruutujen silmukoista yksi pois. Kavenna 3. krs:lla ruskeiden ruutujen silmukoista yksi pois. Kavenna 4. krs:lla ruskeiden ruutujen silmukoista yksi pois. Kavenna jäljellä olevat silmukat niin, että kavennat yhden silmukan, virkkaat yhden kaventamatta, kavennat yhden, yksi kaventamatta jne. Aivan lopussa voit kaventaa joka silmukalla, jos haluat (kärjestä tulee hieman pyöreämpi).

Peukalon virkkaaminen kannattaa aloittaa peukalonhangan puolelta, jolloin kerroksen vaihtumiskohta jää piiloon peukalon sisäsyrjälle. Osuta kuvion kerrokset kohdalleen myös peukalossa, ja vaihda kuviota aina 3 krs:n jälkeen. Koska peukaloaukon leveys on 8 silmukkaa (yht. 16 s), kulmista täytyy poimia yht. 2 s lisää, jotta kokonaissilmukkamääräksi tulee 18 s, ja peukalon kuvioon saadaan sekä 3 valkoista ruutua että 3 ruskeaa. Kiinnitä huomiota silmukoiden löysyyteen ensimmäisellä kerroksella, muutoin peukalon juureen saattaa muodostua kiristävä rengas.

Virkkaa peukalon kuviota kunnes peukalon kärki on piilossa, kuvan lapasissa yht. 8 krs (tai haluamasi pituus), ja aloita kärkikavennukset. Kavenna 1. krs:lla yksi silmukka sekä valkoisissa että ruskeissa ruuduissa. Kavenna 2. krs:lla joka toinen silmukka, ja virkkaa joka toinen kaventamatta jne. Lopussa voit tarvittaessa kaventaa joka silmukalla.

Päättele langanpäät.

Valmiit lapaset pesin ja vanutin kevyesti. Kuivuneet lapaset harjasin nurjalta puolelta.


In English

Both natural white and natural brown yarns are Villa Laurila's thick unplied yarn, 285 x 4 tex, 100 % Finnish Sheep yarn. I needed 120 g for these mittens, a bit more brown yarn than white one. Mittens crocheted with two colours are very thick and warm due to the loose strands on the reverse.

This is a very simple basic mitten pattern with no thumb wedge. These mittens fits for a child of about 10 to 11 years old. I used 4.0 mm hook, and pulled the stitches rather loose.

The pattern is divisible by 6 (3 s white, 3 s brown). In the mittens on the photo there are 36 stitches, and using the same yarn, you will need 42 stitches for adults' size. If you use thinner yarn, you may need to crochet for example 48 or 54 stitches.

Crochet 36 chain stitches, and join them with a slip stitch. Crochet 5 rows of slip stitches into the back loop of the stitch. It's worth making a short 'cuff' by crocheting into the back loop, because that keeps the cuff straight and it won't curl up. When crocheting the first row, an alternative is to crochet into the small bumb behind the chain (camel hump). That will make the edge look a bit different.

After the narrow 'cuff', continue crocheting slip stitches, but now into the front loop. Try to keep your stitches loose. Crocheting into the front loop namely easily pulls the stitches tighter than intended, and your mitten may become way too narrow. Start crocheting the pattern, and crochet 11 rows (or desired lenght).

Pattern: 3 s in white, 3 s brown, etc. On the second row continue similarly, ie crochet white on white, and brown on brown. Crochet like this three rows (the pattern is 3x3). When you start the 4th row, crochet brown into the white. Note: When changing the pattern (every 3 rows), at the 'seam' you will need to crochet 6 stitches in the same colour (tie the long loop on the reverse side).

xxx ooo xxx ooo
ooo xxx ooo xxx
ooo xxx ooo xxx
ooo xxx ooo xxx
xxx ooo xxx ooo
xxx ooo xxx ooo
xxx ooo xxx ooo  <--

After having crocheted the pattern for 11 rows (or the desired lenght), leave an opening for the thumb. Note:  Because at the 'seam' the pattern is not intact, and the 'seam' slides towards upper left row by row, it is better to leave the 'seam' on the palm side. In the right hand mitten leave the tail (spot where you first started) on the thumb side, and in the left hand mitten leave the tail on the little finger side.

For thumb opening, crochet 8 chain stitches (Note: change colours respectively to pattern), jump over 8 stitches in the mitten, and then connect the chain of stitches onto the edge of the mitten again. (If you make women's size mittens, 8 stitches will be enough for that size, too.)

Continue crocheting the pattern until the little finger is covered; in the mitten on the photo it was 12 rows. Start then decreasing. Note: Change the patterns every 3 rows (alternatively you could leave the pattern unchanged, and stripes will form in the mitten top). Decrease on the 1st row one stitch in each white square. Decrease on the 2nd row again one stitch in every white square. Decrease on the 3rd row one stitch in each brown square. Decrease on the 4th row again one stitch in every brown square. For the rest of the stitches, decrease one, crochet one (no decreasing), decrease one, crochet one, etc. At the very end you may want to decrease in every stitch (that will make the top a bit rounder).

Start crocheting the thumb on the thumb web side so that the 'seam' will be invisible on the inner side of the thumb. Match the pattern colours on the thumb, too, and change patterns every 3 rows. Because the width of the thumb opening is 8 stitches (total 16 s), you will need to pick up total 2 additional stitches at the corners. The total stitch count needs to be 18 s so that there will be both 3 white squares and 3 brown ones on the thumb. Pay attention on the gauge especially on the first row, in order to avoid a tight ring at the base of the thumb.

Crochet the pattern until the tip of the thumb is covered, in the mittens on the photo that was 8 rows (or the desired lenght), and start decreasing. Decrease on the 1st row one stitch in every white and every brown square. Decrease on the 2nd row every second stitch (decrease one, crochet one, decrease one, etc). At the end decrease in every stitch if necessary.

Weave in the threads.

Finished mittens I washed and felted slightly. After drying I brushed the inside fluffy, for warmth.

Happy crocheting :) !


sunnuntai 11. maaliskuuta 2012

Raidalliset lapaset - Striped mittens

Aikaisempien raidallisten ribbipipojen innoittamana halusin kokeilla, onnistuisiko lapasten virkkaus samalla tavalla, litteänä tasona.

When I crocheted the striped ribbed beanies, I was curious to try if I could croched mittens in a similar manner, as a flat piece. In English at the bottom of the page.


Nämä lapaset on virkattu piilosilmukoilla, aina edellisen kerroksen silmukoiden takareunasta, ja työ on tehty tasona edestakaisin: Lapasta virkataan pystysuunnassa ja vuorotellen kämmenpuolelta ja kämmenselän puolelta. Jos raitoja seuraa, ne kulkevat ranteenpuoleisesta reunasta ylös - sormiosa - ranteenpuolinen reuna - sormiosa - sisäranne - sormiosa - ulkoranne - jne.

Lapaset on aloitettu ranteesta, virkkaamalla 33+1 ketjusilmukkaa pikkusormen puoleiseen reunaan, kääntymällä ketjun päässä, ja virkkaamalla takaisin rannetta kohti piilosilmukoilla (takareunasta). Viimeinen, ns. 'kääntymissilmukka', on virkattu toisella värillä, työ on käännetty, ja virkattu kohti sormiosaa. Sormiosan päässä ei ole käännytty, vaan virkattu ensimmäisen väriraidan ympäri ja alas vastakkaiseen ranteenreunaan. Ranteenreunassa tehdään yksi kääntymissilmukka, työ käännetään ja jatketaan samalla värillä sormiosan kautta takaisin 'värinvaihtoreunaan'.

Pystyraitoja on yhteensä 20 (1 väriraita = 2 kerrosta). Peukaloaukko sijaitsee 16 s päässä ranteesta laskien, peukaloaukon leveys on 4 väriraitaa (=8 krs), ja peukalon pituus 10 s.

Toisen lapasen aloitin pikkusormen puoleisesta reunasta, ja lopuksi virkkasin nurjalta puolelta kiinni (voi myös ommella neulalla) sekä peukalon sauman että lapasen peukaloreunanpuoleisen pitkän sauman. Ennen sauman sulkemista peukaloon voi oikealta puolelta ommella pari apupistoa (tai käyttää paria pientä hakaneulaa), jotta peukalon saa asettumaan oikeaan asentoon.

Vastaavasti toisen lapasen aloitin peukalonpuoleisesta reunasta, ja alku näytti hieman y-kirjaimelta. Lopuksi virkkasin nurjalta kiinni peukalon sauman ja pikkusormenpuoleisen pitkän sauman.

Lapaset näyttävät mielestäni aika kummallisilta neliskanttisine kärkineen, mutta Ravelrysta huomasin myöhemmin hämmästyksekseni, että tuontapaisista lapasista näkyi olevan amerikkalaisilla paljonkin projektikuvia. Ideani olikin siis jo keksitty aikaisemmin ;) .


In English
These mittens were crocheted in slip stitches (always to the back loop), to and fro from wrist to top to wrist to top, etc.

I started the mittens by crocheting 33+1 chain stitches, for the edge of the little finger. I turned at the end of the row, and crocheted back to wrist edge (slip stitches; back loop). The last stitch, "a stitch for turning", I already crocheted with the other colour. Turned the work, and continued crocheting. At the end of the row, however, I crocheted 'around' the row, and continued again to the wrist edge, turned, and continued to the other wrist edge, where I changed colours again. Colours were changed at the palm side of the wrist/cuff.

In these mittens there are 20 colour stripes (1 stripe = 2 rows). The thumb opening sits 16 stitches from the wrist, it is 4 colour stripes (8 rows) wide, and the length of the thumb is 10 stitches.

One mitten I started at the edge near the little finger, and afterwards crocheted (could use darning needle, too), from the reverse side, to close both the thumb seam, and the long seam at the forefinger edge. To get the thumb into a right position, it may be helpful to make a couple of stitches to the thumb seam by hand first.

The other mitten I started at the thumb/forefinger edge, and the beginning looked a bit like letter "y". That mitten was finished by closing the thumb seam, and the long seam at the little finger edge.

I thought these mittens look rather peculiar with their square tops, and later on I was rather surpised to find out that in Ravelry there seems to be several project photos about this type of mittens. So, the idea I had had, had already been invented before ;)


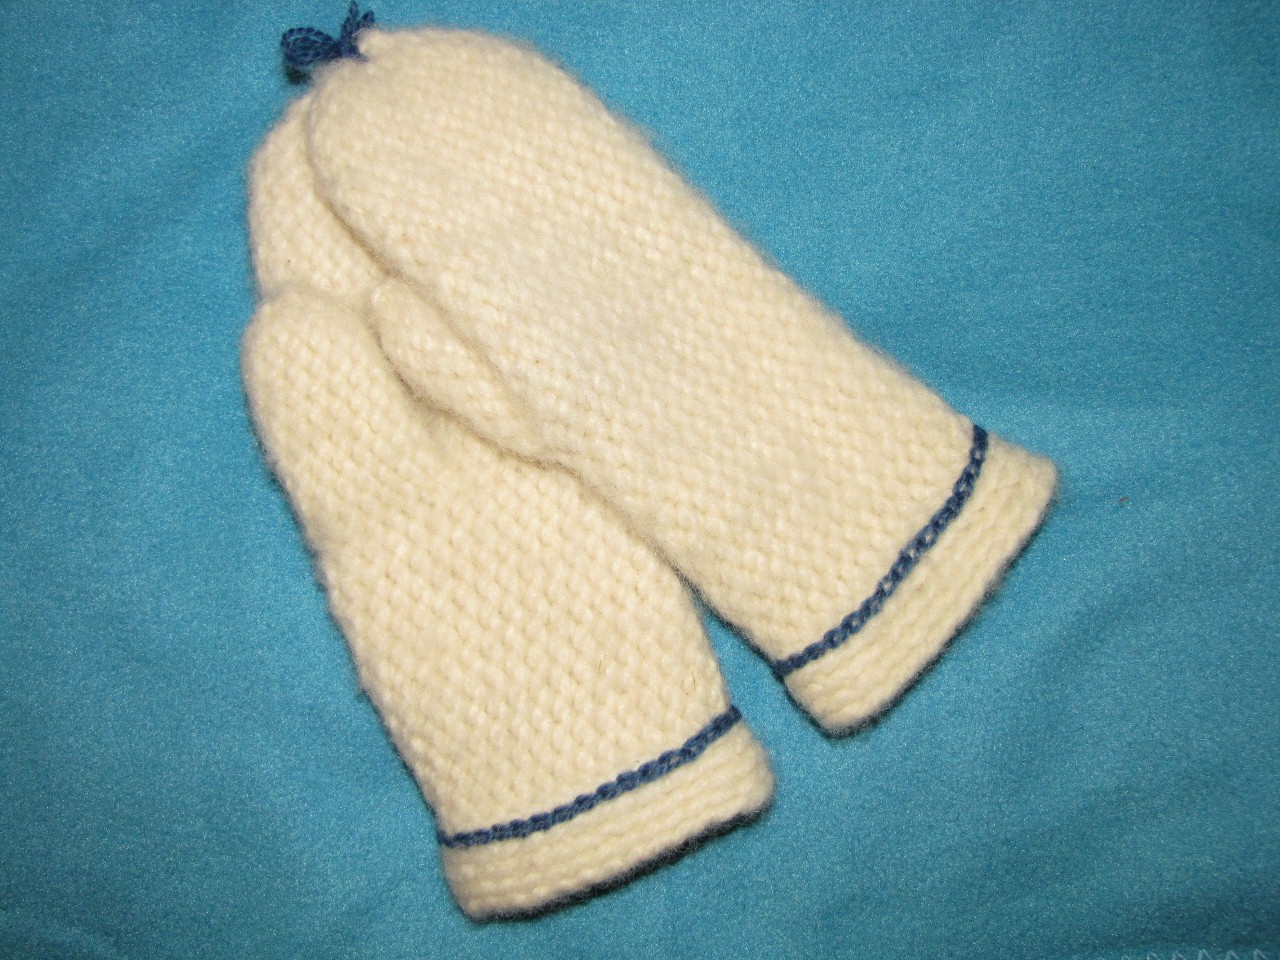
Valkoiset lapaset - White mittens

Piilosilmukoilla virkatut lapaset lasten kokoa. Ohje alempana.

Mittens crocheted in slip stitches, children's size. Instructions in English at the bottom of the page.


Lankana Villa Laurilan 4-säikeinen hahtuvalanka, 285 x 4 tex, 100 % suomenlammasvillaa. Sininen lanka Riihivillalta, indigovärjättyä Aarni-lankaa.

Hyvin yksinkertainen lapasen perusmalli, ei peukalokiilaa. Kuvan lapanen mahtuu 12-vuotiaalle lapselle tai pienikätiselle naiselle. Koukun koko oli 5 mm, ja virkkasin löysiä silmukoita.

Aloitukseen 28 ketjusilmukkaa (TAI sen verran,että ketju yltää hyvin käden ympäri), yhdistetään renkaaksi piilosilmukalla. Virkataan muutama kerros piilosilmukoita niin, että poimitaan koukulle edellisen kerroksen silmukan takareuna.  Lapasensuuhun kannattaa tehdä parin sentin reunus tällä tavoin, jotta suu ei lähde rullautumaan, vaan pysyy suorana. Ensimmäistä kerrosta virkatessa voi poimia vaihtoehtoisesti ketjusilmukkaketjun takaa sen 'pampulan' (camel hump). Tällöin aloituskerroksen reunasta tulee hieman erinäköinen.

Tämän jälkeen virkataan piilosilmukoita niin, että koukulle poimitaan edellisen kerroksen silmukoiden etureuna. Virkkaa haluamasi pituinen ranneosuus. Kuvan lapasessa vaakaraitakerroksia on reunuksessa viisi, ja helmimäisiä kerroksia ranneosassa, ennen peukaloaukkoa, 11 kerrosta. Peukaloaukkoa varten virkkasin 5 ketjusilmukkaa, ja hyppäsin 5 silmukan yli ennen kuin kiinnitin silmukkaketjun lapasen reunaan (HUOM. Jos käytät eripaksuista lankaa tai teet erikokoista lapasta, saatat tarvita enemmän tai vähemmän kuin 5 s.). Jatka piilosilmukoilla, poimien silmukan etureuna, kunnes pikkusormen pää on piilossa. Kavenna parilla kerroksella 1 silmukka kummallakin sivulla (yht. 4 s), ja kavenna sen jälkeen joka silmukalla. Sulje lapasen kärki ja päättele lanka nurjalle. Poimi peukaloa varten peukaloaukon ylä- ja alareunasta 5 silmukkaa kummastakin (TAI niin monta kuin ylempänä jätit peukaloaukkoa varten) sekä molemmista kulmista 2 silmukka (yht. 14 s.). Virkkaa piilosilmukoita (etureunasta) kunnes peukalonkärki on peitossa, ja kavenna sen jälkeen joka silmukalla. Sulje peukalonkärki ja päättele lanka nurjalle. Kuvan lapasessa peukaloa virkattiin 7 kerrosta, jonka jälkeen aloitettiin kavennukset. Päättele loput langanpäät.

Pesin valmiit lapaset ja vanutin kevyesti. Kuivuneet lapaset harjasin sekä nurjalta että oikealta puolelta ja ompelin sinisellä langalla ketjusilmukoita koristeeksi.


In English

Yarn from Villa Laurila, thick single ply, 285 x 4 tex, 100 % Finnish Sheep breed yarn. Blue yarn from Riihivilla, Aarni, dyed with Japanese indigo.

Very simple type of a mitten, no increases for thumb wedge. These mittens I made fit for a 12 years old child or small-handed woman. I  used 5.0 mm hook, and pulled the loops rather loose.

To start, crochet 28 chain stithces (OR as many as you need to fit the chain around the hand), and connect the chain to a circle with a slip stitch. Crochet slip stithches, and for the first few rows pick up the back loop of the stitches in the previous row. It's good to make a short 'edging' in this way, so the cuff stays straight and won't curl up. When crocheting the first row, another option is to pick up the small bumb behind the chain (camel humb). By that way the edge will look a bit different.

Continue crocheting slip stitches, but after the 'cuff', pick up the front loop of the stitches in previous row. Crochet the wrist part for the lenght you prefer. In the mittens on the photo, there are first five horizontal stripes (back loop), and then 11 rows (front loop) before the thumb opening. For the thumb hole I crocheted 5 chain stitches, and skipped 5 stitches before connected the chain to the mitten edge again (NOTE If you use another kind of yarn, or make a different size, you may need more or less than 5 st). Continue in slip stitches, picking up the front loop, until the tip of little finger is covered. Then decrease 1 stitch on both sides of the mitten, do that twice (total 4 st), and after that decrease in every stitch. Close the mitten top, and hide yarn in the reverse side. For thumb, pick up 5 stitches on both upper and lower edges of the thumb opening (OR as many stitches as you left for thumb opening, see above), and 2 stitches in each corner (total 14 st). Crochet in slip stitches (front loop) until the tip of the thumb is covered, and then decrease in every stitch. Close the thumb top, and hide the yarn in the reverse side. In the mittens on the photo, there are 7 rows in the thumb before the decreases. Hide the rest of loose yarns.

I washed and slightly felt the finished mittens. After they were dry again, I brushed them on both sides, and decorated the cuff by sewing blue chain stitches with a needle.