sunnuntai 11. maaliskuuta 2012

My so called scarf -huivi

Vaihteeksi jotain neulottua. Allison Isaacsin My so called scarf (linkistä pääsee Ravelryn sivulle, josta löytyy linkki sekä kirjalliseen ohjeen että videoon). Lankana Wollmeise 100 % merino, väri Tutu (dark). Lankaa kului yksi 150 g vyyhti, ja huivin koko on 16 x 192 cm.

Something knitted, for a change. Allison Isaacs's My so called scarf (click the link to enter Ravelry page where you can find both written instructions, and a video link). Yarn is Wollmeise 100 % merino, colour Tutu (dark). I used one 150 g skein, and the size of the scarf is 16 x 192 cm (ab. 6 x 76 inches).


Raidalliset lapaset 2 - Striped Mittens 2

Toisetkin virkatut, pystyraidalliset lapaset.

Another pair of crocheted mittens with vertical stripes. In English at the bottom.


Lanka on BC Garnin Semillaa, joka jäi yli viimeviikkoisesta neulakinnaskokeilustani. Lapaset sopivat noin 8 - 10-vuotiaalle, ja silmukoita oli muistaakseni 56. Lapaset on virkattu piilosilmukoilla: ranteensuussa muutama kerros silmukan takareunaan, ja muu osa aina silmukan etureunaan. Vinoraidat on saatu aikaan virkkaamalla punaisen silmukan kohdalle sininen, ja sinisen kohdalle punainen. Muutaman kerroksen välein siirsin kuviota yhden silmukan verran.

Lanka tuntui käsissä jotenkin liukkaalta ja hankalta, ja silmukkakoko tahtoi vaihdella. Jouduinkin purkamaan toisen lapasen puoliväliin peräti kahteen kertaan, että sain siitä samankokoisen kuin ensimmäinen lapanen. Semilla huopuu, joten pesin lapaset (sininen lanka päästi väriä), ja kuivuttuaan harjasin sisäpuolelta pehmoisiksi.


This yarn is BC Garn Semilla, a leftover from one of my nalbinding trials last week. The size fits for about 8 to 10 year old child, and if I recall correct, there were 56 stitches. The mittens were crocheted in slip stitches: at the cuff there are a few rows into the back loop, and the rest into the front loop. The biased stripes form by crocheting blue stitch into a red one, and a red stitch into a blue one. After every few rows I moved the pattern by one stitch.

For some reason I thought this yarn felt slippery and difficult in my hands, and my gauge did not stay even, so I had to undo the other mitten till half way twice before I got a matching pair. Semilla yarn felts, so I washed the mitts by hand (the blue yarn leaked), and after drying, I brushed them on the reverse side soft and fluffy.


Raidalliset lapaset - Striped mittens

Aikaisempien raidallisten ribbipipojen innoittamana halusin kokeilla, onnistuisiko lapasten virkkaus samalla tavalla, litteänä tasona.

When I crocheted the striped ribbed beanies, I was curious to try if I could croched mittens in a similar manner, as a flat piece. In English at the bottom of the page.


Nämä lapaset on virkattu piilosilmukoilla, aina edellisen kerroksen silmukoiden takareunasta, ja työ on tehty tasona edestakaisin: Lapasta virkataan pystysuunnassa ja vuorotellen kämmenpuolelta ja kämmenselän puolelta. Jos raitoja seuraa, ne kulkevat ranteenpuoleisesta reunasta ylös - sormiosa - ranteenpuolinen reuna - sormiosa - sisäranne - sormiosa - ulkoranne - jne.

Lapaset on aloitettu ranteesta, virkkaamalla 33+1 ketjusilmukkaa pikkusormen puoleiseen reunaan, kääntymällä ketjun päässä, ja virkkaamalla takaisin rannetta kohti piilosilmukoilla (takareunasta). Viimeinen, ns. 'kääntymissilmukka', on virkattu toisella värillä, työ on käännetty, ja virkattu kohti sormiosaa. Sormiosan päässä ei ole käännytty, vaan virkattu ensimmäisen väriraidan ympäri ja alas vastakkaiseen ranteenreunaan. Ranteenreunassa tehdään yksi kääntymissilmukka, työ käännetään ja jatketaan samalla värillä sormiosan kautta takaisin 'värinvaihtoreunaan'.

Pystyraitoja on yhteensä 20 (1 väriraita = 2 kerrosta). Peukaloaukko sijaitsee 16 s päässä ranteesta laskien, peukaloaukon leveys on 4 väriraitaa (=8 krs), ja peukalon pituus 10 s.

Toisen lapasen aloitin pikkusormen puoleisesta reunasta, ja lopuksi virkkasin nurjalta puolelta kiinni (voi myös ommella neulalla) sekä peukalon sauman että lapasen peukaloreunanpuoleisen pitkän sauman. Ennen sauman sulkemista peukaloon voi oikealta puolelta ommella pari apupistoa (tai käyttää paria pientä hakaneulaa), jotta peukalon saa asettumaan oikeaan asentoon.

Vastaavasti toisen lapasen aloitin peukalonpuoleisesta reunasta, ja alku näytti hieman y-kirjaimelta. Lopuksi virkkasin nurjalta kiinni peukalon sauman ja pikkusormenpuoleisen pitkän sauman.

Lapaset näyttävät mielestäni aika kummallisilta neliskanttisine kärkineen, mutta Ravelrysta huomasin myöhemmin hämmästyksekseni, että tuontapaisista lapasista näkyi olevan amerikkalaisilla paljonkin projektikuvia. Ideani olikin siis jo keksitty aikaisemmin ;) .


In English
These mittens were crocheted in slip stitches (always to the back loop), to and fro from wrist to top to wrist to top, etc.

I started the mittens by crocheting 33+1 chain stitches, for the edge of the little finger. I turned at the end of the row, and crocheted back to wrist edge (slip stitches; back loop). The last stitch, "a stitch for turning", I already crocheted with the other colour. Turned the work, and continued crocheting. At the end of the row, however, I crocheted 'around' the row, and continued again to the wrist edge, turned, and continued to the other wrist edge, where I changed colours again. Colours were changed at the palm side of the wrist/cuff.

In these mittens there are 20 colour stripes (1 stripe = 2 rows). The thumb opening sits 16 stitches from the wrist, it is 4 colour stripes (8 rows) wide, and the length of the thumb is 10 stitches.

One mitten I started at the edge near the little finger, and afterwards crocheted (could use darning needle, too), from the reverse side, to close both the thumb seam, and the long seam at the forefinger edge. To get the thumb into a right position, it may be helpful to make a couple of stitches to the thumb seam by hand first.

The other mitten I started at the thumb/forefinger edge, and the beginning looked a bit like letter "y". That mitten was finished by closing the thumb seam, and the long seam at the little finger edge.

I thought these mittens look rather peculiar with their square tops, and later on I was rather surpised to find out that in Ravelry there seems to be several project photos about this type of mittens. So, the idea I had had, had already been invented before ;)


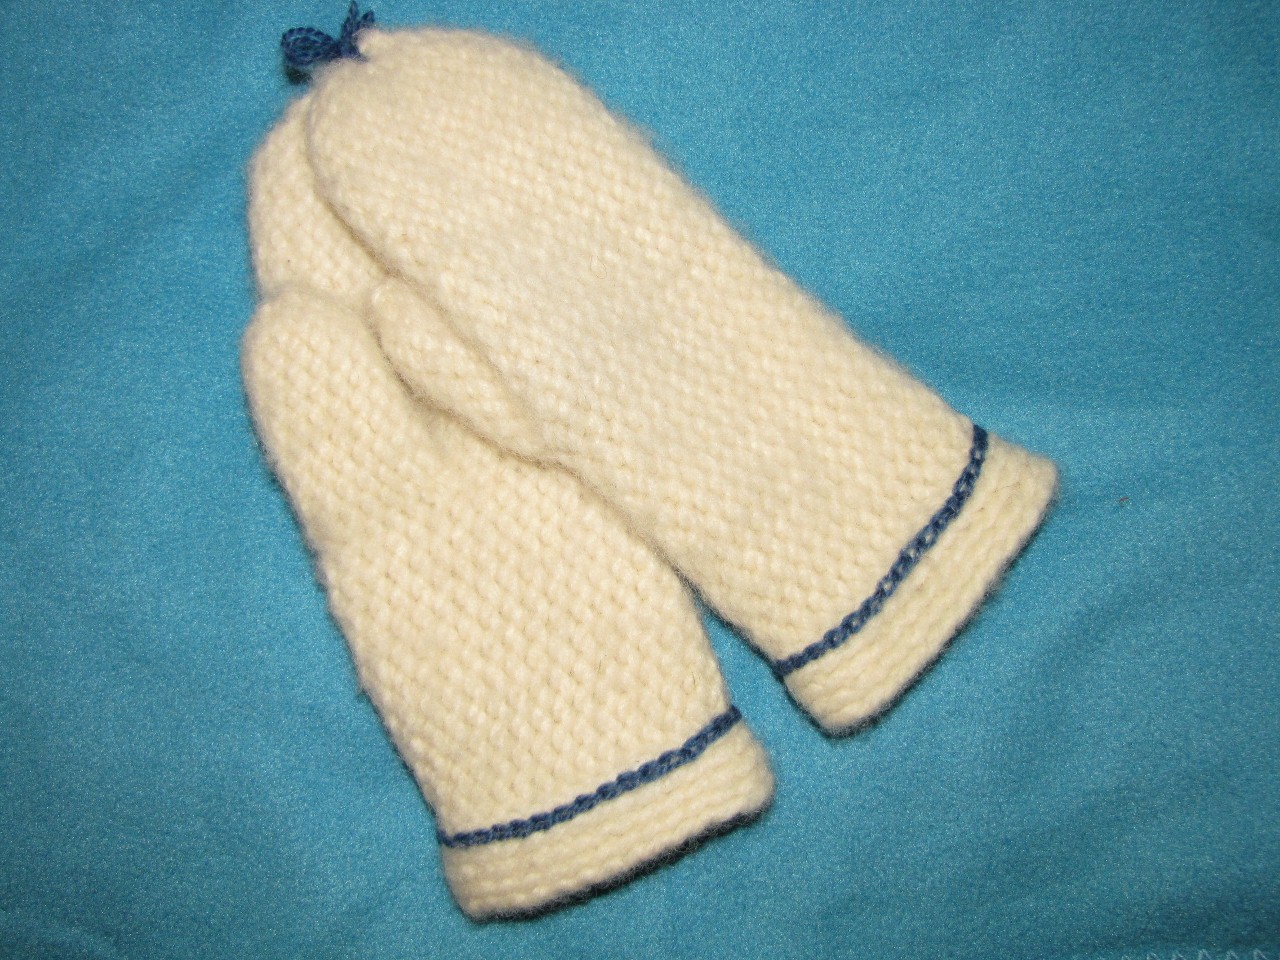
Valkoiset lapaset - White mittens

Piilosilmukoilla virkatut lapaset lasten kokoa. Ohje alempana.

Mittens crocheted in slip stitches, children's size. Instructions in English at the bottom of the page.


Lankana Villa Laurilan 4-säikeinen hahtuvalanka, 285 x 4 tex, 100 % suomenlammasvillaa. Sininen lanka Riihivillalta, indigovärjättyä Aarni-lankaa.

Hyvin yksinkertainen lapasen perusmalli, ei peukalokiilaa. Kuvan lapanen mahtuu 12-vuotiaalle lapselle tai pienikätiselle naiselle. Koukun koko oli 5 mm, ja virkkasin löysiä silmukoita.

Aloitukseen 28 ketjusilmukkaa (TAI sen verran,että ketju yltää hyvin käden ympäri), yhdistetään renkaaksi piilosilmukalla. Virkataan muutama kerros piilosilmukoita niin, että poimitaan koukulle edellisen kerroksen silmukan takareuna.  Lapasensuuhun kannattaa tehdä parin sentin reunus tällä tavoin, jotta suu ei lähde rullautumaan, vaan pysyy suorana. Ensimmäistä kerrosta virkatessa voi poimia vaihtoehtoisesti ketjusilmukkaketjun takaa sen 'pampulan' (camel hump). Tällöin aloituskerroksen reunasta tulee hieman erinäköinen.

Tämän jälkeen virkataan piilosilmukoita niin, että koukulle poimitaan edellisen kerroksen silmukoiden etureuna. Virkkaa haluamasi pituinen ranneosuus. Kuvan lapasessa vaakaraitakerroksia on reunuksessa viisi, ja helmimäisiä kerroksia ranneosassa, ennen peukaloaukkoa, 11 kerrosta. Peukaloaukkoa varten virkkasin 5 ketjusilmukkaa, ja hyppäsin 5 silmukan yli ennen kuin kiinnitin silmukkaketjun lapasen reunaan (HUOM. Jos käytät eripaksuista lankaa tai teet erikokoista lapasta, saatat tarvita enemmän tai vähemmän kuin 5 s.). Jatka piilosilmukoilla, poimien silmukan etureuna, kunnes pikkusormen pää on piilossa. Kavenna parilla kerroksella 1 silmukka kummallakin sivulla (yht. 4 s), ja kavenna sen jälkeen joka silmukalla. Sulje lapasen kärki ja päättele lanka nurjalle. Poimi peukaloa varten peukaloaukon ylä- ja alareunasta 5 silmukkaa kummastakin (TAI niin monta kuin ylempänä jätit peukaloaukkoa varten) sekä molemmista kulmista 2 silmukka (yht. 14 s.). Virkkaa piilosilmukoita (etureunasta) kunnes peukalonkärki on peitossa, ja kavenna sen jälkeen joka silmukalla. Sulje peukalonkärki ja päättele lanka nurjalle. Kuvan lapasessa peukaloa virkattiin 7 kerrosta, jonka jälkeen aloitettiin kavennukset. Päättele loput langanpäät.

Pesin valmiit lapaset ja vanutin kevyesti. Kuivuneet lapaset harjasin sekä nurjalta että oikealta puolelta ja ompelin sinisellä langalla ketjusilmukoita koristeeksi.


In English

Yarn from Villa Laurila, thick single ply, 285 x 4 tex, 100 % Finnish Sheep breed yarn. Blue yarn from Riihivilla, Aarni, dyed with Japanese indigo.

Very simple type of a mitten, no increases for thumb wedge. These mittens I made fit for a 12 years old child or small-handed woman. I  used 5.0 mm hook, and pulled the loops rather loose.

To start, crochet 28 chain stithces (OR as many as you need to fit the chain around the hand), and connect the chain to a circle with a slip stitch. Crochet slip stithches, and for the first few rows pick up the back loop of the stitches in the previous row. It's good to make a short 'edging' in this way, so the cuff stays straight and won't curl up. When crocheting the first row, another option is to pick up the small bumb behind the chain (camel humb). By that way the edge will look a bit different.

Continue crocheting slip stitches, but after the 'cuff', pick up the front loop of the stitches in previous row. Crochet the wrist part for the lenght you prefer. In the mittens on the photo, there are first five horizontal stripes (back loop), and then 11 rows (front loop) before the thumb opening. For the thumb hole I crocheted 5 chain stitches, and skipped 5 stitches before connected the chain to the mitten edge again (NOTE If you use another kind of yarn, or make a different size, you may need more or less than 5 st). Continue in slip stitches, picking up the front loop, until the tip of little finger is covered. Then decrease 1 stitch on both sides of the mitten, do that twice (total 4 st), and after that decrease in every stitch. Close the mitten top, and hide yarn in the reverse side. For thumb, pick up 5 stitches on both upper and lower edges of the thumb opening (OR as many stitches as you left for thumb opening, see above), and 2 stitches in each corner (total 14 st). Crochet in slip stitches (front loop) until the tip of the thumb is covered, and then decrease in every stitch. Close the thumb top, and hide the yarn in the reverse side. In the mittens on the photo, there are 7 rows in the thumb before the decreases. Hide the rest of loose yarns.

I washed and slightly felt the finished mittens. After they were dry again, I brushed them on both sides, and decorated the cuff by sewing blue chain stitches with a needle.


tiistai 27. syyskuuta 2011

Mitähän tästä tulee?! - What is yet to come

Ostin kesällä koukkuamiskoukun, ja pitihän sitä kokeilla!

I bought a Tunisian Crochet hook in the summer, and of course I had to try it! In English at the bottom of the page.

Koukkuamalla tehty huivi
Scarf made in Tunisian Crochet

Koukuttu huivi
Scarf made in Tunisian Crochet
Lankana Punta Yarns Merisoft, käsinmaalattu HP74. Taivaallisen pehmeä ja suloinen lanka, tästä vedenvihreästä (-sinisestä) sävystä puhumattakaan. Lankaa kului hieman alle 2 vyyhtiä - sillä yhdellä pätkällä virkkasin viime keväänä tekemiini kynsikkäisiin sormenpäät :) . Silmukoita oli 20, ja valmiilla huivilla on kokoa noin 14 x 190 cm. Huivi yltää kaulan ympäri kahdesti.

Kokeilin erilaisia tapoja poimia 'pylväät' koukulle edelliseltä kerrokselta, ja lopulta päädyin tällaiseen, jossa poimin (oikealta vasemmalle laskettuna) 3. pylvään, 2. pylvään, 5. pylvään, 4. pylvään jne. Valmiissa pinnassa 'pylväät' menevät ristiin. Löysin videonkin, Tunisian Cross Stitch.


In English

Yarn is Punta Yarns Merisoft, colour HP74. Heavenly soft and sweet, not to mention the wonderful water green (blue) shade. I used just under 2 skeins - with the missing just-under-part I crocheted finger tips to my fingerless gloves I crocheted last spring :) . Had 20 stitches, and the size of the finished scarf is about 5.5 x 75 inches. The scarf can be wrapped twice around the neck.

I was experimenting different ways to pick up the 'columns' of the previous row onto the hook, and finally I ended up with this model in which I picked up (counted from right to left) the 3rd column, 2nd one, 5th one, 4th one, etc. In the finished surface there's a cross pattern. Found a tutorial video, too, Tunisian Cross Stitch. 


perjantai 9. syyskuuta 2011

Missä palaa? - Where's the Fire?

Syksyn ruskan värit! Virkatun möbius-huivin ohje alempana.

Spicing up with the autumn tints! Pattern for this crocheted moebius cowl in English at the bottom of the page.

Möbius-huivi
Moebius cowl


Ostin Punta Yarnsin Merisoft -lankaa, monisävyistä oranssia (HP61) ja solidia keltaista (SOL410), ihanan pehmoista ja sileää merinovillaa. Hyllyssä oli monta houkuttelevaa väriä, mutta nämä kaksi väriä olivat äänekkäimmät ;) . Kotona sitten arvuuttelin, mitähän ihanaista tekisin - neuloisinko puikoilla vai kinnasneulalla vai virkkaisinko. Muutaman erilaisen silmukka- ja värikokeilun jälkeen päädyin virkkaamaan ribattua möbius-huivia. Huivin koko ja värit muotoutuivat samalla, kun virkkasin.

Lanka Punta Yarns Merisoft Aran, yhteensä 300 g. Koukku oli 6 mm, mutta olisi voinut olla hieman isompikin.

Huivi on virkattu piilosilmukoilla, vuorotellen kaksi kerrosta silmukan etureunasta ja kaksi kerrosta silmukan takareunasta takakautta. Värit on vaihdettu niin, että värillä A 1 krs silmukan etureunasta ja 1 krs silmukan takareunasta takakautta, ja värillä B 1 krs silmukan takareunasta takakautta ja 1 krs silmukan etureunasta, ja taas värillä A 1 krs silmukan etureunasta ja 1 krs silmukan takareunasta takakautta. Näin toinen väri nousee ribin 'harjaan' ja toinen jää ribin 'pohjaan', eli huivin toisella puolella näkyy enemmän väriä A ja toisella väriä B. Jos värien haluaa sekoittuvan enemmän, voi virkata värillä A 2 krs silmukan etureunasta ja värillä B 2 krs silmukan takareunasta takakautta.

Aloitukseen virkkasin n. 150 cm ketjusilmukoita (190 kjs). Parin ensimmäisen kerroksen jälkeen huivilenkin leveys oli noin 70 cm, ja valmiin huivin leveys ('ristin' yli mitattuna) noin 65 cm. Huivissa oleva kierre söi yllättävän paljon aloitusketjun pituudesta, ja valmis huivi olisi mielestäni saanut olla hieman leveämpi, eli aloitusketjusta olisi kannattanut tehdä ehkä 15 cm pitempi.

Liitin ketjun renkaaksi niin, että siihen jäi yksi kierre, eli liitoskohdasta en jatkanut virkkaamista ketjun yläreunan silmukoihin, vaan ketjun alareunaan. Aloitusvärillä virkkasin ensimmäisen ketjusilmukkaketjun lisäksi vain yhden kokonaisen kerroksen (190+190 silmukkaa), jottei väriraidasta tulisi liian leveä seuraaviin verrattuna. Sen jälkeen vaihdoin väriä ja ja silmukkatyyppiä ed. kappaleessa kuvatulla tavalla.

Möbius-huivi etenee keskeltä molemmille reunoilla itsestään, eli jos virkkaat aloituksen värillä A, ja sen jälkeen värillä B, muodostuu huiviin raidat B-A-B. Huivin keskikohtaan jäävästä aloituskerroksesta laskien viiden kohollaan olevan ribbiraidan jälkeen vaihdoin värejä niin, että tein toisella värillä 4 krs (kahden sijasta), ja jatkoin sitten entiseen tapaan, jolloin ribbien harjalla ollut väri siirtyi ribbien pohjaan ja päinvastoin.

Langat voi värin vaihtuessa joko katkaista ja päätellä, tai huopuvan langan ollessa kyseessä, liittää eriväristen lankojen päät toisiinsa huovuttamalla (ns. spit join) tai letittämällä ja huovuttamalla (linkki erilaisiin jatkoksiin).


In English


I bought some Punta Yarns Merisoft yarn, hand painted orange (HP61) and solid yellow (SOL410), such a lovely and soft merino wool. In the shop shelves there were many temptating colours, but these two called my name loudliest ;) . At home I was then wondering what and how to do - should I knit, nalbind or crochet. After a few tests with different stitch types and colour changes I ended up crocheting ribbed möbius cowl. Didn't do much preplanning, and the size of the cowl and colours shaped while I was working.

Yarn is Punta Yarns Merisoft Aran, total 300 grams (three skeins). I used 6.0 mm hook, but it could had been 7.0 mm hook, too.

This cowl is crocheted in slip stitches, in turns two rows into the Front Loop, and two rows into the Back Loop from back to front. The colours I changed after every two rows so, that I crocheted in colour A 1 row into the Front Loop, and 1 row into the Back Loop from back to front, and in colour B 1 row into the Back Loop from back to front, and 1 row into the Front Loop, and then again in col A 1 row into the Front Loop, and 1 row into the Back Loop from back to front. By this way one colour rises on the top of each ridge, and the other colour sinks down into the valley. If you want the colours to get more mixed, you can croched in col A 2 rows into the Front Loop, and in col B 2 rows into the Back Loop from back to front.

First I crocheted about 150 cm (59 inches) of chain stitches (190 ch st). After the first couple of rows the cowl width was about 70 cm, and in finished cowl (measure across the 'twist') the width was about 60 cm. The moebius twist used up surprisingly quite a lot of the allowance, and I would have preferred a bit more wide cowl, so I guess the foundation row should had been about 15 cm longer.

I joined the ends together so that there was one twist left in the chain, that is, after joining I did not continue to crochet into the top edge of the foundation row, but into the bottom edge. In the first colour A I crocheted, in addition to the foundation row of chain stithces, only one full row (190+190 stitches), so that that stripe would not look to wide compared to the next ones. After that I changed colours and stitch types (Front vs. Back Loop) like described in previous chapter.

The moebius cowl grows from center to both edges by itselft, meaning that if you crochet first in col A, and then full row in col B, there will be stripes B-A-B. The first foundation row remains in the center of the cowl, and when I had 5 raised ridges (both on left and right of the foundation row), I changed the colous so that instead of working 2 rows in one colour, I crocheted 4 rows in the same colour, and then continued as before. By that way the colour that was on the top of the ridge sunk down to the valley (between ridges), and the one in the valley rose to the top.

To change the colours, either cut the yarns, and hide the ends, or if you are using a felting yarn like Merisoft, you could felt the ends of yellow and orange yarn together (so called spit join), or braid and felt.

keskiviikko 24. elokuuta 2011

Ribbipipo - Ribbed beanie

Tällainen pipo tällä kertaa. Ohut lirppana ja joustava :) . Virkatun pipon ohjeet sivun alaosassa.

This kind of beanie this time. Thin and bit floppy and stretchy :) . Pattern for this crocheted beanie in English at the bottom of the page.

Virkattu pipo
Crocheted beanie

Virkattu pipo
Crocheted beanie


Virkattu pipo
Crocheted beanie

Lankana on Novitan Puro. Vyötteessä annettu puikkokoko 5-6, ja virkkasin 5 mm koukulla. Lankaa kului 65 g.

Pipo on virkattu piilosilmukkavirkkauksella. Virkkaussuunta on pysty, eli reunasta päälaelle ja takaisin. Lopputulos muistuttaa ulkonäöltään 2o 2n -joustinneuletta. Pipossa on 56 pystyraitaa (yksi raita = 2 kerrosta, siis reunasta päälaelle ja takaisin), ja joustinneuletta muistuttavat raidat syntyvät niin, että joka toinen raita virkataan edellisen kerroksen silmukan etureunasta (normaalisti etukautta) ja joka toinen ed. kerroksen silmukan takareunasta takakautta. Eli virkataan silmukan etureunasta yksi kerros päälaelle ja toinen takaisin reunaan, ja seuraavaksi silmukan takareunasta takakautta yksi kerros päälaelle ja toinen takaisin reunaan. Itse huomasin, että koukku oli helpompi pujottaa silmukan takareunasta takakautta, kun käytin koukkasin silmukan virkkuukoukun väkäsellä (en siis koukun päällä).

Silmukkamäärät eli raitojen pituudet olivat 37-28-33-28-33-28-37-28-... ja lisäksi aina yksi ketjusilmukka kunkin raidan kääntymiskohtaan, eli esim. 28 ps ja 1 kjs.  Pystyraitoja tässä pipossa on yhteensä 56, ja jokainen raita on 2 kerrosta.

Aloitukseen, jos aloitetaan samoilla silmukkamäärillä kuin yllä, virkataan 37+1 ketjusilmukkaa, käännytään, ja virkataan 37 piilosilmukkaa (etureunasta) sekä 1 ketjusilmukka.


Toiseen raitaan virkataan 28 piilosilmukkaa (takareunasta takakautta) ja 1 ketjusilmukka. Käännytään, virkataan 28 ps ja 1 kjs. Jos jatketaan ylempänä olevan numerosarjan mukaan, yksi 'lohko' on 6 raidan levyinen, ja pipossa on yhteensä 9 tällaista 'lohkoa'.

Lopuksi takasauma joko ommellaan neulalla tai virkataan kiinni nurjalta. Poimin toisesta reunasta silmukan takareunan takakautta ja toisesta etureunan. Oikea kohta nurjalta katsottuna voi olla ensin hankala hahmottaa, mutta näin saumakohta uppoaa piiloon eikä erotu valmiista piposta. Päälaella oleva aukko suljetaan pujottamalla neulalla lanka viimeisten yhdeksän silmukan läpi ja kiristämällä aukko umpeen.

Valmis pipo on joustava ja sopii sekä aikuiselle että lapselle.


In English

Yarn is Novita Puro. Yarn band says to use 5-6 mm knitting needles, and I used 5.0 mm hook. I needed 65 grams of yarn.
This beanie was crocheted in slip stitch crochet, from ears to top and back. The surface looks a bit like 2k 2p ribbing. There are 56 vertical stripes in the beanie, and each stripe consists of two rows, ie from ears to top and back. The ribbing pattern comes from crocheting every other stripe into front loop (from front to back, as usual), and every second stripe into back loop, from back to front. That is, crochet one row from ears to top, in slip stitches into front loop, and similarly back to ears, and then another row from ears to top, into back loop, from back to front, and then back to ears. I thought it was easier to catch the back loop by using the lip of the hook to help.

The stitch count, or the lenght of each stripe, was as follows: 37-28-33-28-33-28-37-28-... and in addition one extra stitch, just a plain chain stitch, at the end of each stripe for turning allowance, ie e.g. 28 slip stitches + 1 chain stitch.

To start, if you work the rows like mentioned above, crochet 37+1 chain stitches, turn the work, and crochet back 37 slip stitches (front loop), and 1 chain stitch.

For the second colour stripe, crochet 22 slip stitches (back loop, from back to front) and 1 chain stitch. Turn the work, crochet 28 slip stitches (back loop, from back to front), and 1 chain stitch. If you continue according the stitch numbers above (37-28-33-...), one 'section' will be 6 stripes wide, and there will be total 9 sections.

Finally either sew with a needle or crochet the back seam together. Turn the work reverse side towards yourself, and insert the hook into the back loop, from back to front, of each stitch of one edge, and into front loops on the other edge. At first it may be a bit difficult to see where to push the hook into, but by that way the back seam will sink in, and will be unnoticeable. Close the small opening at the top by pulling a yarn through the last 9 loops, and pulling the gap closed.


This beanie is stretchy, and fits both to adults and children.