sunnuntai 11. maaliskuuta 2012

My so called scarf -huivi

Vaihteeksi jotain neulottua. Allison Isaacsin My so called scarf (linkistä pääsee Ravelryn sivulle, josta löytyy linkki sekä kirjalliseen ohjeen että videoon). Lankana Wollmeise 100 % merino, väri Tutu (dark). Lankaa kului yksi 150 g vyyhti, ja huivin koko on 16 x 192 cm.

Something knitted, for a change. Allison Isaacs's My so called scarf (click the link to enter Ravelry page where you can find both written instructions, and a video link). Yarn is Wollmeise 100 % merino, colour Tutu (dark). I used one 150 g skein, and the size of the scarf is 16 x 192 cm (ab. 6 x 76 inches).


Raidalliset lapaset 2 - Striped Mittens 2

Toisetkin virkatut, pystyraidalliset lapaset.

Another pair of crocheted mittens with vertical stripes. In English at the bottom.


Lanka on BC Garnin Semillaa, joka jäi yli viimeviikkoisesta neulakinnaskokeilustani. Lapaset sopivat noin 8 - 10-vuotiaalle, ja silmukoita oli muistaakseni 56. Lapaset on virkattu piilosilmukoilla: ranteensuussa muutama kerros silmukan takareunaan, ja muu osa aina silmukan etureunaan. Vinoraidat on saatu aikaan virkkaamalla punaisen silmukan kohdalle sininen, ja sinisen kohdalle punainen. Muutaman kerroksen välein siirsin kuviota yhden silmukan verran.

Lanka tuntui käsissä jotenkin liukkaalta ja hankalta, ja silmukkakoko tahtoi vaihdella. Jouduinkin purkamaan toisen lapasen puoliväliin peräti kahteen kertaan, että sain siitä samankokoisen kuin ensimmäinen lapanen. Semilla huopuu, joten pesin lapaset (sininen lanka päästi väriä), ja kuivuttuaan harjasin sisäpuolelta pehmoisiksi.


This yarn is BC Garn Semilla, a leftover from one of my nalbinding trials last week. The size fits for about 8 to 10 year old child, and if I recall correct, there were 56 stitches. The mittens were crocheted in slip stitches: at the cuff there are a few rows into the back loop, and the rest into the front loop. The biased stripes form by crocheting blue stitch into a red one, and a red stitch into a blue one. After every few rows I moved the pattern by one stitch.

For some reason I thought this yarn felt slippery and difficult in my hands, and my gauge did not stay even, so I had to undo the other mitten till half way twice before I got a matching pair. Semilla yarn felts, so I washed the mitts by hand (the blue yarn leaked), and after drying, I brushed them on the reverse side soft and fluffy.


Raidalliset lapaset - Striped mittens

Aikaisempien raidallisten ribbipipojen innoittamana halusin kokeilla, onnistuisiko lapasten virkkaus samalla tavalla, litteänä tasona.

When I crocheted the striped ribbed beanies, I was curious to try if I could croched mittens in a similar manner, as a flat piece. In English at the bottom of the page.


Nämä lapaset on virkattu piilosilmukoilla, aina edellisen kerroksen silmukoiden takareunasta, ja työ on tehty tasona edestakaisin: Lapasta virkataan pystysuunnassa ja vuorotellen kämmenpuolelta ja kämmenselän puolelta. Jos raitoja seuraa, ne kulkevat ranteenpuoleisesta reunasta ylös - sormiosa - ranteenpuolinen reuna - sormiosa - sisäranne - sormiosa - ulkoranne - jne.

Lapaset on aloitettu ranteesta, virkkaamalla 33+1 ketjusilmukkaa pikkusormen puoleiseen reunaan, kääntymällä ketjun päässä, ja virkkaamalla takaisin rannetta kohti piilosilmukoilla (takareunasta). Viimeinen, ns. 'kääntymissilmukka', on virkattu toisella värillä, työ on käännetty, ja virkattu kohti sormiosaa. Sormiosan päässä ei ole käännytty, vaan virkattu ensimmäisen väriraidan ympäri ja alas vastakkaiseen ranteenreunaan. Ranteenreunassa tehdään yksi kääntymissilmukka, työ käännetään ja jatketaan samalla värillä sormiosan kautta takaisin 'värinvaihtoreunaan'.

Pystyraitoja on yhteensä 20 (1 väriraita = 2 kerrosta). Peukaloaukko sijaitsee 16 s päässä ranteesta laskien, peukaloaukon leveys on 4 väriraitaa (=8 krs), ja peukalon pituus 10 s.

Toisen lapasen aloitin pikkusormen puoleisesta reunasta, ja lopuksi virkkasin nurjalta puolelta kiinni (voi myös ommella neulalla) sekä peukalon sauman että lapasen peukaloreunanpuoleisen pitkän sauman. Ennen sauman sulkemista peukaloon voi oikealta puolelta ommella pari apupistoa (tai käyttää paria pientä hakaneulaa), jotta peukalon saa asettumaan oikeaan asentoon.

Vastaavasti toisen lapasen aloitin peukalonpuoleisesta reunasta, ja alku näytti hieman y-kirjaimelta. Lopuksi virkkasin nurjalta kiinni peukalon sauman ja pikkusormenpuoleisen pitkän sauman.

Lapaset näyttävät mielestäni aika kummallisilta neliskanttisine kärkineen, mutta Ravelrysta huomasin myöhemmin hämmästyksekseni, että tuontapaisista lapasista näkyi olevan amerikkalaisilla paljonkin projektikuvia. Ideani olikin siis jo keksitty aikaisemmin ;) .


In English
These mittens were crocheted in slip stitches (always to the back loop), to and fro from wrist to top to wrist to top, etc.

I started the mittens by crocheting 33+1 chain stitches, for the edge of the little finger. I turned at the end of the row, and crocheted back to wrist edge (slip stitches; back loop). The last stitch, "a stitch for turning", I already crocheted with the other colour. Turned the work, and continued crocheting. At the end of the row, however, I crocheted 'around' the row, and continued again to the wrist edge, turned, and continued to the other wrist edge, where I changed colours again. Colours were changed at the palm side of the wrist/cuff.

In these mittens there are 20 colour stripes (1 stripe = 2 rows). The thumb opening sits 16 stitches from the wrist, it is 4 colour stripes (8 rows) wide, and the length of the thumb is 10 stitches.

One mitten I started at the edge near the little finger, and afterwards crocheted (could use darning needle, too), from the reverse side, to close both the thumb seam, and the long seam at the forefinger edge. To get the thumb into a right position, it may be helpful to make a couple of stitches to the thumb seam by hand first.

The other mitten I started at the thumb/forefinger edge, and the beginning looked a bit like letter "y". That mitten was finished by closing the thumb seam, and the long seam at the little finger edge.

I thought these mittens look rather peculiar with their square tops, and later on I was rather surpised to find out that in Ravelry there seems to be several project photos about this type of mittens. So, the idea I had had, had already been invented before ;)


Valkoiset lapaset - White mittens

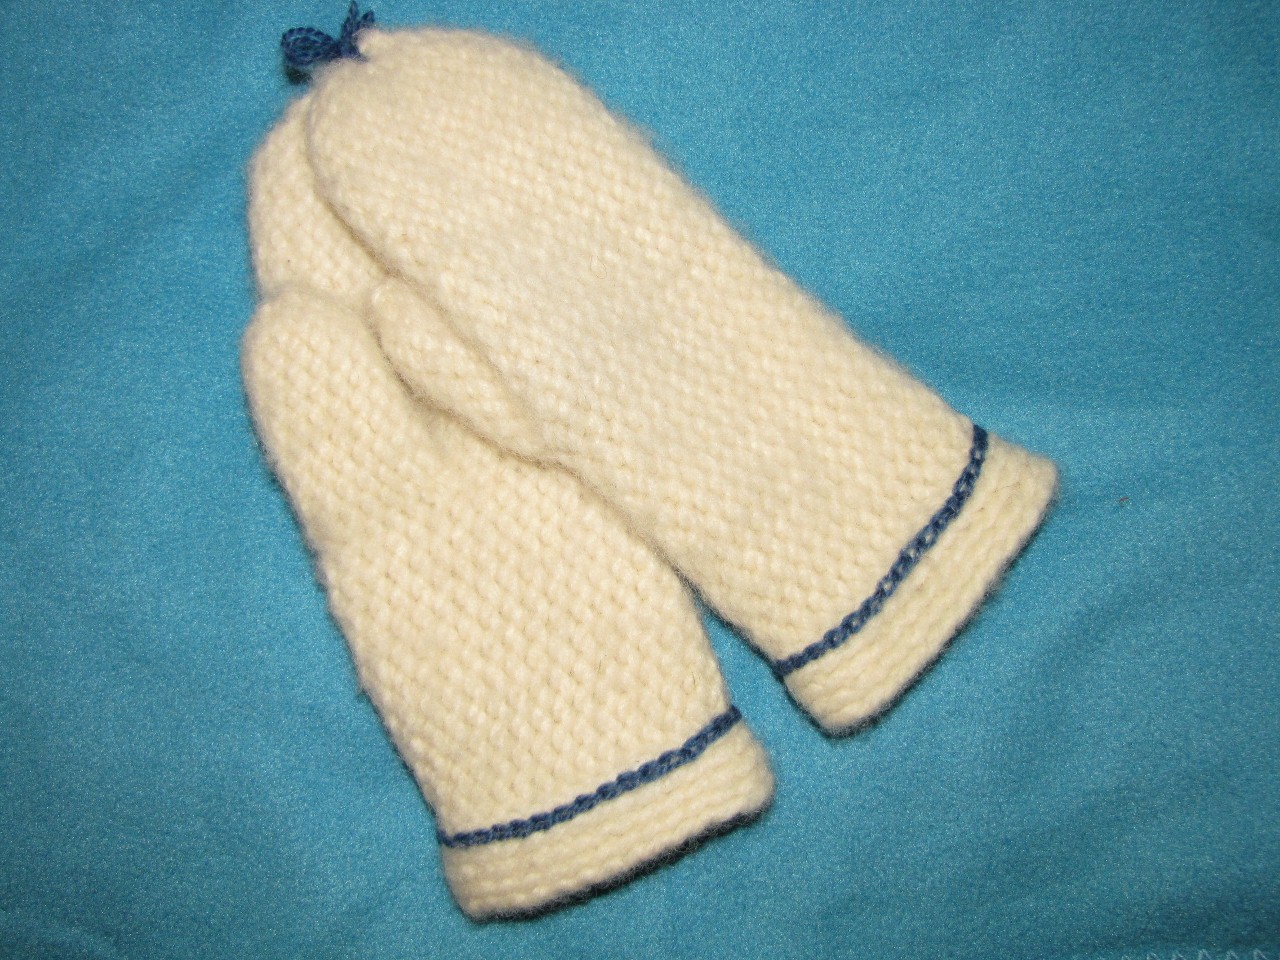
Piilosilmukoilla virkatut lapaset lasten kokoa. Ohje alempana.

Mittens crocheted in slip stitches, children's size. Instructions in English at the bottom of the page.


Lankana Villa Laurilan 4-säikeinen hahtuvalanka, 285 x 4 tex, 100 % suomenlammasvillaa. Sininen lanka Riihivillalta, indigovärjättyä Aarni-lankaa.

Hyvin yksinkertainen lapasen perusmalli, ei peukalokiilaa. Kuvan lapanen mahtuu 12-vuotiaalle lapselle tai pienikätiselle naiselle. Koukun koko oli 5 mm, ja virkkasin löysiä silmukoita.

Aloitukseen 28 ketjusilmukkaa (TAI sen verran,että ketju yltää hyvin käden ympäri), yhdistetään renkaaksi piilosilmukalla. Virkataan muutama kerros piilosilmukoita niin, että poimitaan koukulle edellisen kerroksen silmukan takareuna.  Lapasensuuhun kannattaa tehdä parin sentin reunus tällä tavoin, jotta suu ei lähde rullautumaan, vaan pysyy suorana. Ensimmäistä kerrosta virkatessa voi poimia vaihtoehtoisesti ketjusilmukkaketjun takaa sen 'pampulan' (camel hump). Tällöin aloituskerroksen reunasta tulee hieman erinäköinen.

Tämän jälkeen virkataan piilosilmukoita niin, että koukulle poimitaan edellisen kerroksen silmukoiden etureuna. Virkkaa haluamasi pituinen ranneosuus. Kuvan lapasessa vaakaraitakerroksia on reunuksessa viisi, ja helmimäisiä kerroksia ranneosassa, ennen peukaloaukkoa, 11 kerrosta. Peukaloaukkoa varten virkkasin 5 ketjusilmukkaa, ja hyppäsin 5 silmukan yli ennen kuin kiinnitin silmukkaketjun lapasen reunaan (HUOM. Jos käytät eripaksuista lankaa tai teet erikokoista lapasta, saatat tarvita enemmän tai vähemmän kuin 5 s.). Jatka piilosilmukoilla, poimien silmukan etureuna, kunnes pikkusormen pää on piilossa. Kavenna parilla kerroksella 1 silmukka kummallakin sivulla (yht. 4 s), ja kavenna sen jälkeen joka silmukalla. Sulje lapasen kärki ja päättele lanka nurjalle. Poimi peukaloa varten peukaloaukon ylä- ja alareunasta 5 silmukkaa kummastakin (TAI niin monta kuin ylempänä jätit peukaloaukkoa varten) sekä molemmista kulmista 2 silmukka (yht. 14 s.). Virkkaa piilosilmukoita (etureunasta) kunnes peukalonkärki on peitossa, ja kavenna sen jälkeen joka silmukalla. Sulje peukalonkärki ja päättele lanka nurjalle. Kuvan lapasessa peukaloa virkattiin 7 kerrosta, jonka jälkeen aloitettiin kavennukset. Päättele loput langanpäät.

Pesin valmiit lapaset ja vanutin kevyesti. Kuivuneet lapaset harjasin sekä nurjalta että oikealta puolelta ja ompelin sinisellä langalla ketjusilmukoita koristeeksi.


In English

Yarn from Villa Laurila, thick single ply, 285 x 4 tex, 100 % Finnish Sheep breed yarn. Blue yarn from Riihivilla, Aarni, dyed with Japanese indigo.

Very simple type of a mitten, no increases for thumb wedge. These mittens I made fit for a 12 years old child or small-handed woman. I  used 5.0 mm hook, and pulled the loops rather loose.

To start, crochet 28 chain stithces (OR as many as you need to fit the chain around the hand), and connect the chain to a circle with a slip stitch. Crochet slip stithches, and for the first few rows pick up the back loop of the stitches in the previous row. It's good to make a short 'edging' in this way, so the cuff stays straight and won't curl up. When crocheting the first row, another option is to pick up the small bumb behind the chain (camel humb). By that way the edge will look a bit different.

Continue crocheting slip stitches, but after the 'cuff', pick up the front loop of the stitches in previous row. Crochet the wrist part for the lenght you prefer. In the mittens on the photo, there are first five horizontal stripes (back loop), and then 11 rows (front loop) before the thumb opening. For the thumb hole I crocheted 5 chain stitches, and skipped 5 stitches before connected the chain to the mitten edge again (NOTE If you use another kind of yarn, or make a different size, you may need more or less than 5 st). Continue in slip stitches, picking up the front loop, until the tip of little finger is covered. Then decrease 1 stitch on both sides of the mitten, do that twice (total 4 st), and after that decrease in every stitch. Close the mitten top, and hide yarn in the reverse side. For thumb, pick up 5 stitches on both upper and lower edges of the thumb opening (OR as many stitches as you left for thumb opening, see above), and 2 stitches in each corner (total 14 st). Crochet in slip stitches (front loop) until the tip of the thumb is covered, and then decrease in every stitch. Close the thumb top, and hide the yarn in the reverse side. In the mittens on the photo, there are 7 rows in the thumb before the decreases. Hide the rest of loose yarns.

I washed and slightly felt the finished mittens. After they were dry again, I brushed them on both sides, and decorated the cuff by sewing blue chain stitches with a needle.